
My daughter, "Doodle" is turning four years old tomorrow! We celebrated her birthday over the weekend with a Tangled-themed party.
She's watched the Tangled movie at least a hundred times and loves to re-enact all of the scenes when Rapunzel uses her hair to complete her daily tasks. One of her presents was a long-braided Tangle wig. She now uses the braid to open doors, turn off lights and paint pictures. She also used it as a weapon on the other children at her party. She was quickly reprimanded and forced to surrender the wig.
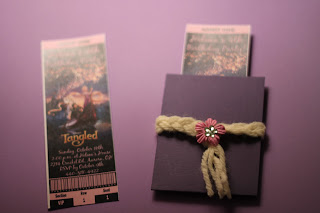
When planning her party, I came across a shop that creates tickets made to match your party theme. Allyson from Invitation Designs created this adorable Tangled ticket invitation. I ordered the tickets and a few hours later I had my printable custom tickets in my gmail account!
I wanted to make a ticket holder for these fabulous invites, so I came up with a ticket holder. Here is my tutorial:
Glue Dots
Purple Cardstock
Adhesive Pen
Yellow Yarn
Paper Flowers
Adhesive Rhinestones
Glue Gun
Step one
Cut your cards stock 3.5" by 8". Fold in half to create a pocket that is 3.5" by 4". Use an adhesive pen to seal the inside edges, leaving the top edge open.

Step two
For each pocket created, cut 9 pieces of yellow yarn about 9" long. Tie the ends of 9 pieces of yarn together in a knot. I tucked my knot under my paper cutter to hold it in place while I braided them. When you finishing braiding, tie off with another piece of yellow yarn . Trim excess if you like.

Step three
Using a glue dot or glue from your glue gun, adhere end of braid to the center front of your ticket holder. Wrap braid around ticket holder and glue. Be sure to leave a bit of the braid hanging.

Step four
Using your glue gun, adhere paper flower to section where the braid is joined together. Finally, adhere your gemstone of choice!

Voila! You have a finished ticket holder!

 | |
| My first attempt at cake making |
She's watched the Tangled movie at least a hundred times and loves to re-enact all of the scenes when Rapunzel uses her hair to complete her daily tasks. One of her presents was a long-braided Tangle wig. She now uses the braid to open doors, turn off lights and paint pictures. She also used it as a weapon on the other children at her party. She was quickly reprimanded and forced to surrender the wig.
When planning her party, I came across a shop that creates tickets made to match your party theme. Allyson from Invitation Designs created this adorable Tangled ticket invitation. I ordered the tickets and a few hours later I had my printable custom tickets in my gmail account!
I wanted to make a ticket holder for these fabulous invites, so I came up with a ticket holder. Here is my tutorial:
Materials Needed:
Scissors and Paper CutterGlue Dots
Purple Cardstock
Adhesive Pen
Yellow Yarn
Paper Flowers
Adhesive Rhinestones
Glue Gun
Step one
Cut your cards stock 3.5" by 8". Fold in half to create a pocket that is 3.5" by 4". Use an adhesive pen to seal the inside edges, leaving the top edge open.

Step two
For each pocket created, cut 9 pieces of yellow yarn about 9" long. Tie the ends of 9 pieces of yarn together in a knot. I tucked my knot under my paper cutter to hold it in place while I braided them. When you finishing braiding, tie off with another piece of yellow yarn . Trim excess if you like.

Step three
Using a glue dot or glue from your glue gun, adhere end of braid to the center front of your ticket holder. Wrap braid around ticket holder and glue. Be sure to leave a bit of the braid hanging.

Step four
Using your glue gun, adhere paper flower to section where the braid is joined together. Finally, adhere your gemstone of choice!

Voila! You have a finished ticket holder!


